
A storm rolled through two nights ago. You are in a driveway at 8:15am with a homeowner who is nervous and half-convinced the out-of-state crew that knocked yesterday told them the truth. You climb up, walk the slopes, come down. What you do in the next twenty minutes decides whether this becomes a paid claim and a signed job, or a “we didn’t find enough to file” conversation that ends with the homeowner calling the next truck.
Here is the short answer. A storm damage roof inspection is a documentation job, not a look-around. You work the roof in a fixed order so you miss nothing, tell hail apart from wind and both apart from plain age, and photograph every finding three ways so the adjuster can approve it without a second trip. Get it right and the claim mostly runs itself. Skip it and even a totaled roof gets denied because the paperwork never proved it. This is the full checklist, the photo protocol, the homeowner script, and the state laws that decide what you can legally say.
Key Takeaways
- An inspection is evidence, not a verdict. The adjuster pays what the file proves, so a documented single slope beats an undocumented total loss.
- Know what counts. Hail shows as bruised round dents, knocked-off granules, and exposed mat. The National Weather Service calls hail “severe” only at 1 inch or larger, and engineers say most shingle damage comes from stones 1.5 inches and up (Insurance Journal).
- Photograph every finding three ways: overview, context, and a tight close-up with a measurement in frame. One photo proves nothing to an adjuster working off a satellite image.
- Move fast on the clock. Florida bars a claim unless notice is given within one year of the date of loss, and many policies run shorter (Fla. Stat. 627.70132).
- Stay on the legal side. You can document all day, but you cannot adjust the homeowner’s claim or offer to eat their deductible. Florida fines that up to $10,000 per violation (Fla. Stat. 489.147).
Table of contents
- Why a sloppy inspection costs you the claim
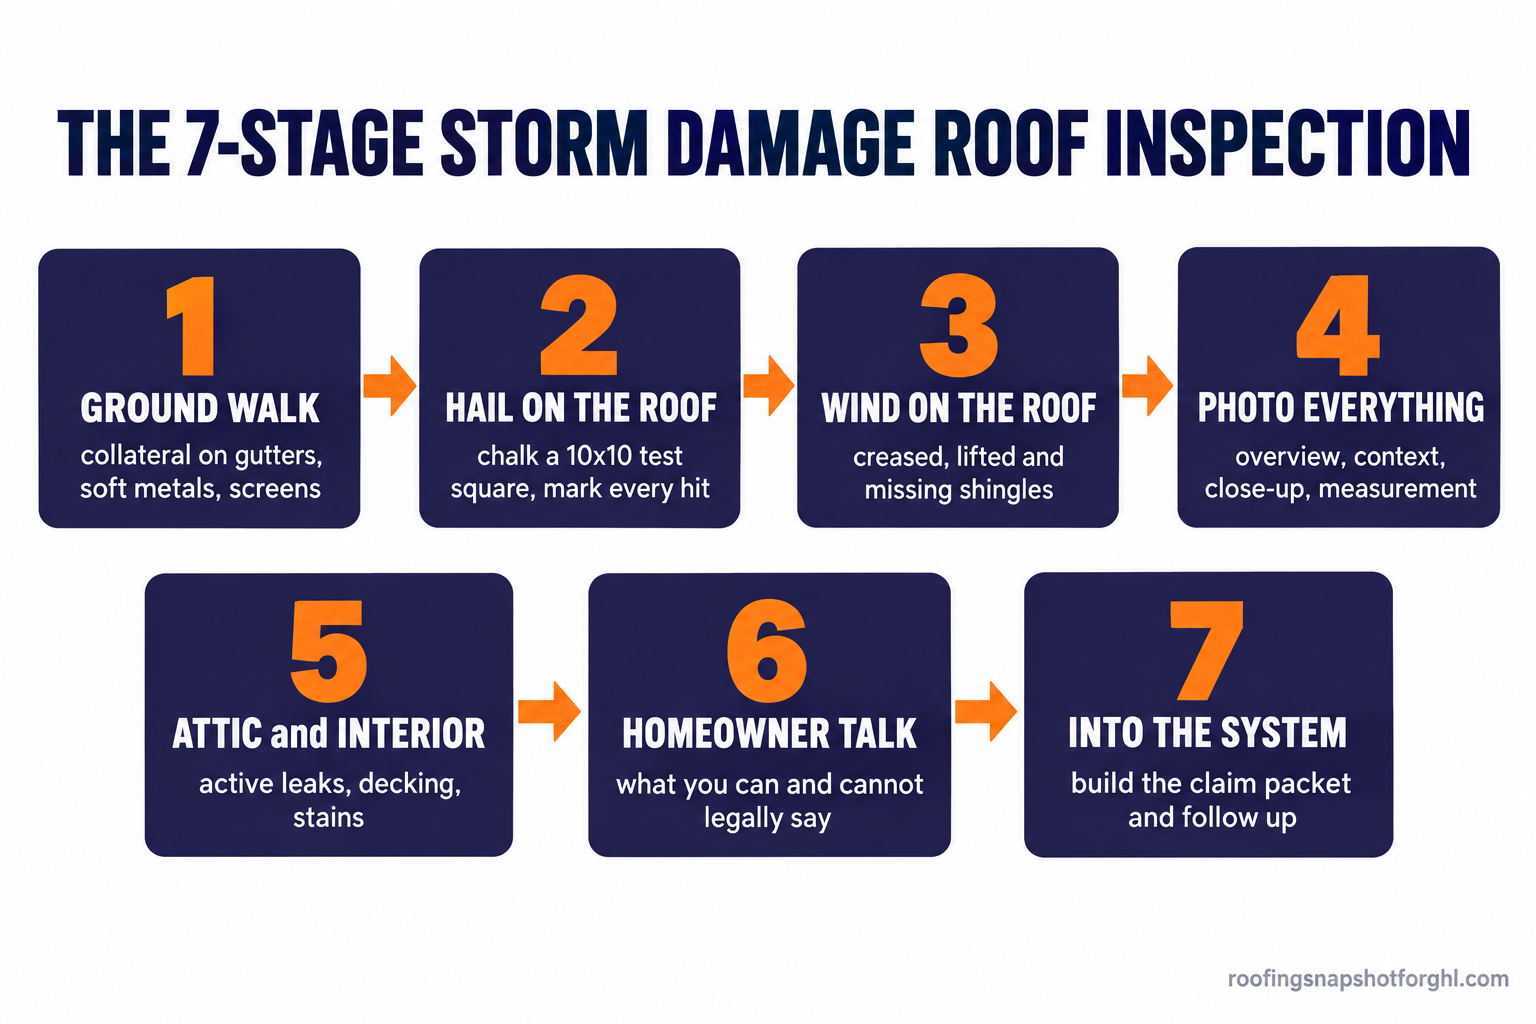
- The 7-stage inspection system
- Stage 1: Walk the ground first
- Stage 2: Read the hail
- Stage 3: Read the wind
- Stage 4: Photograph it for the adjuster
- Stage 5: Check the attic and interior
- Stage 6: The homeowner conversation
- Stage 7: Get it into the system
- Steal this: the checklist and the scripts
- Run it for a solo, mid-size, and large shop
- The legal line you cannot cross
- Objections
- FAQ
Why a sloppy inspection costs you the claim
Storm work is not slowing down. The US logged 5,432 large-hail events in 2025, up from 5,373 in 2024, with Texas alone at 902 (Insurance Information Institute, citing NOAA’s Storm Prediction Center). Severe convective storms drove $51 billion in insured losses in 2025, and hail causes as much as 80 percent of those claims (Insurance Information Institute). Every one is a roof somebody inspected and either got paid for or did not.
Here is where the money leaks. A field adjuster is not out to deny you, but they move fast, often off a satellite measurement. One blurry photo of a scuffed shingle gives them every reason to call it wear. A chalked test square with ten marked impacts, a fractured-mat close-up with a coin for scale, and the collateral on the gutters lets them write the roof without climbing back up. The average full replacement runs about $9,609 nationally, from roughly $5,903 to $13,377 (HomeAdvisor). That is the check your documentation defends, and it is your first sales moment too.
The 7-stage inspection system
Inspecting is a short pipeline, and the claim fails at whichever stage you skip. Run all seven the same way, every roof, and it stays defensible.
Stage 1: Walk the ground first
Setup. Walk the full perimeter before the ladder comes off the truck. You are looking for collateral, the soft-metal evidence that a storm actually hit this address, because that is what corroborates the roof damage. Check gutters and downspouts for dents and pooled granules, the drip edge and fascia, window screens, AC condenser fins, mailbox, and garage door. Note the storm direction to predict which slopes took the worst, and photograph each finding on the spot.
How it breaks. Going straight up skips the most persuasive evidence an adjuster has, because dented AC fins and bruised downspouts are hard to wave off as age. The other mistake is walking only the front. Storms come from a direction, so the back-right elevations can carry the proof while the front looks clean. Walk all four sides, every time.
Stage 2: Read the hail
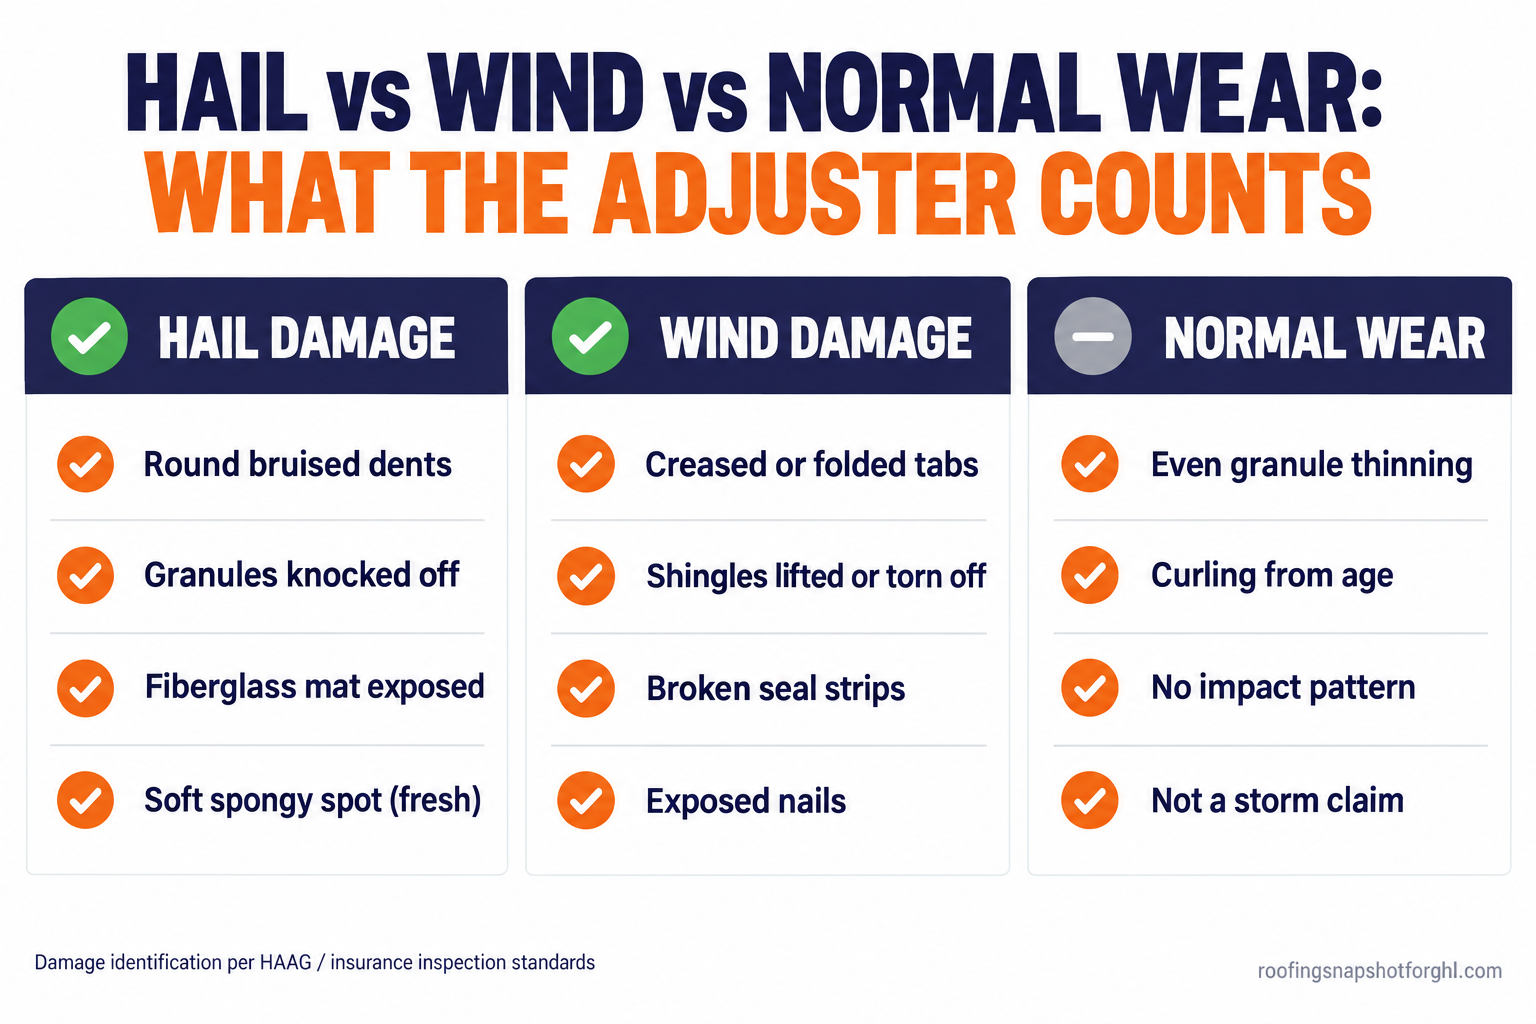
Setup. Hail on asphalt has a specific look: round, bruised dents where the granules are knocked off and the mat shows through, plus soft spots that give under your thumb like a bruise on an apple, meaning the mat has fractured. Chalk a 10 foot by 10 foot test square on a representative slope, circle every impact, and count the hits. That density, across two or three slopes plus the ridge and soft metals, is the core of your claim. Check ridge and hip caps, which take direct hits and fail first.
How it breaks. The big error is calling every mark hail. Blistering, foot-traffic scuffs, and manufacturing flecks fool a rushed eye, and filing those costs you with the carrier. The opposite error is missing real damage because there is no obvious granule loss yet. Research from the Insurance Institute for Business and Home Safety found repeated sub-severe hail quietly weakens shingles and leaves them roughly ten times more susceptible to the next storm (Insurance Journal). Run your hand across the slope for soft spots.
Stage 3: Read the wind
Setup. Wind damage looks nothing like hail, so inspect for it separately. Wind lifts and folds shingle tabs, and when a tab flips back it leaves a crease that permanently breaks the mat even after it lies back down. Look for creased or folded tabs, torn or missing shingles, broken seal strips, and backed-out nails. Shingles are wind-rated from an ASTM D3161 Class F rating of 110 mph up to an ASTM D7158 Class H rating of 190 mph (Professional Roofing, NRCA), but field damage shows up well below those once a roof ages.
How it breaks. Wind damage hides because a creased tab falls back into place and looks fine from ten feet away. Lift the tabs on the windward slopes by hand and look for the crease line and the failed seal. The second break is scope: a storm that brought wind and hail did both, so document the wind too and keep those findings in their own labeled photo set.
Stage 4: Photograph it for the adjuster
Setup. This is the stage that gets claims paid, because the adjuster pays the file, not your memory. Shoot every finding three ways: a wide overview that shows which slope, a context shot that shows the pattern or the chalked square, and a tight close-up with something for scale, a coin or a tape. Photograph the house number so the set ties to this property.
How it breaks. The top reason good damage gets denied is lazy photos: one far shot, nothing for scale, no overview to place it. An adjuster cannot approve what they cannot see. The other break is a camera roll of 80 unlabeled images nobody can map to a slope. Shoot slope by slope, in a consistent order, so the file reads like a story.
Stage 5: Check the attic and interior
Setup. The roof is only half the inspection. Get into the attic with a flashlight and look for active leaks, stains on the decking and rafters, daylight through the deck, wet insulation, and soft decking. Walk the top-floor ceilings under valleys, chimneys, and skylights for stains and bubbling paint. Note each finding’s location relative to the slope above, because interior damage expands the scope and the decking condition drives whether the job needs a re-deck at tear-off.
How it breaks. Most inspections stop at the shingles and leave the interior, decking, and code upgrades out of the first scope, then scramble to supplement them later. Document them now. The other miss is not connecting a ceiling stain to the storm: an old, dry, outlined stain is pre-existing, but a fresh, damp, spreading stain under a slope full of hail hits is part of the same loss. For the follow-up side, our insurance claim follow-up system walks the stages from inspection to deposit.
Stage 6: The homeowner conversation
Setup. Come down, sit with the homeowner, and walk them through what you found in plain language. Show them the folder: the collateral, the test square and hit count, the creased tabs, the attic stain. Explain the process in order: they file with their carrier, an adjuster comes out, and you will meet that adjuster on the roof. Set the expectation clearly: you handle the roof and documentation, they handle the claim with their insurer.
How it breaks. The honest trap is over-promising. It is tempting to say “we’ll handle your whole claim” or “don’t worry about your deductible,” and both can cross a legal line we cover below. Keep it to what you deliver: a thorough inspection, complete documentation, a crew that shows up. The other break is leaving without a next step, which is how a homeowner goes cold in 48 hours and signs with the next knocker. The storm lead follow-up sequence is built for that gap between inspection and signed contract.
Stage 7: Get it into the system
Setup. The inspection is worthless if it lives on your phone. Before you pull out of the driveway, the findings and photos belong in your system, attached to this contact and triggering the next action: a CRM record, photos uploaded, claim stage set, the homeowner cadence and the adjuster-meeting reminder both running. The goal is that any job you inspected today is a tracked claim by tonight, not a memory you reconstruct Friday from a messy camera roll.
How it breaks. The classic failure is the three-app shuffle: photos in one app, the contact in a spreadsheet, the follow-up in your head. Jobs fall through the cracks between those tools, and the one you forget signs with somebody else. Pick one system that holds the contact, photos, claim stage, and follow-up together, the same tool-sprawl that quietly costs roofing shops jobs.
Steal this: the checklist and the scripts
Print this, laminate it, keep it in the truck. The whole inspection in one pass.
Ground walk (Stage 1)
- Walk all four sides, note storm direction
- Gutters, downspouts, drip edge, fascia: dents and pooled granules
- Window screens, AC condenser fins, mailbox, garage door, painted metal
- Photograph every collateral finding
On the roof (Stages 2 and 3)
- Chalk a 10x10 test square on 2 to 3 slopes, mark and count hits
- Ridge and hip caps for direct hail; feel for soft, bruised spots by hand
- Lift tabs on windward slopes for creases and broken seals
- Note torn, missing, or lifted shingles, exposed nails, flashing, pipe boots
Documentation (Stage 4)
- Every finding shot 3 ways: overview, context, close-up with scale
- House number tied to the set; hail squares chalked and counted before shooting
Interior (Stage 5)
- Attic: active leaks, decking stains, daylight, wet insulation
- Top-floor ceilings under valleys, chimneys, skylights
- Note soft or delaminated decking for re-deck scope
Homeowner message (text to send same day):
Hi [Name], thanks for having me inspect the roof at [address] today. I documented storm damage on [number] slopes plus the gutters and [item], and put together a photo report for your records. When you file with [carrier], send me the adjuster date and I’ll meet them on the roof to walk through everything. Questions, just text me here. [Your name], [Company].
That one message, sent same day, separates a paid job from a lead gone quiet.
Run it for a solo, mid-size, and large shop
The same seven stages run differently by shop size.
| Solo operator | Mid-size (2 to 4 crews) | Large (5+ crews) | |
|---|---|---|---|
| Inspection | You do every one | You plus 1 to 2 inspectors | Dedicated inspection team |
| Photo standard | Checklist in your head | Written, every rep the same | Enforced template, QA’d |
| Into the system | Upload from the driveway | Rep uploads, office confirms | Automated intake, coordinator owns it |
| Biggest risk | You stop following up | Inconsistent documentation | Jobs lost in handoffs |
| Fix | One tool that captures on the roof | One photo standard | Pipeline stages, automated handoffs |
The solo risk is time: you inspect well, then get on a roof for three days and the follow-up dies, so make capture the last step on the ladder and let an automated cadence chase. The mid-size risk is consistency, fixed by one written photo standard. The large risk is handoffs between the inspector, the coordinator, and production, fixed by named pipeline stages and automated handoffs.
The legal line you cannot cross
Read this before you build your process, because the fast way to a fine is to inspect like a public adjuster. You are a contractor. You document damage. You do not adjust the homeowner’s claim, and in several states you are legally barred from trying.
Florida makes it explicit. Under Fla. Stat. 489.147, passed as SB 76 in 2021, a roofing contractor may not interpret policy provisions, advise the homeowner on coverage, or adjust the claim unless licensed as a public adjuster. The same statute bars offering a rebate, gift, cash, or a waiver of the deductible in exchange for a roof inspection or making a claim, with a penalty of up to $10,000 per violation. Wisconsin’s 2013 Act 24 does the same, barring a contractor from promising to pay or rebate any part of a deductible as an inducement. The safe posture: inspect, document, hand over the evidence, and let the homeowner and their carrier handle the claim.
Two more lines. First, the clock: deadlines vary by state and policy, and the policy’s own notice requirement is often shorter than the statute. Florida bars a claim unless notice is given within one year of the date of loss, tied to NOAA’s verified storm date (Fla. Stat. 627.70132). That is the real reason to document fast. Second, automated follow-up texts need consent and a compliant setup, covered in our guide to A2P 10DLC registration for roofing contractors. For the fuller picture, see what roofers can legally say about insurance claims.
Top states by major hail events in 2025. More storms mean more inspections, and every inspection is a claim you either document well or lose. Source: Insurance Information Institute, citing NOAA Storm Prediction Center.
Objections
“The homeowner already had a guy up there. Why inspect again?” The first look was probably a sales pitch, not a documented inspection. Your chalked test squares, three-way photos, and attic findings are what get the carrier to pay, and a homeowner with a thin file and a denied claim is exactly who hires the roofer with evidence.
“This takes too long. I can look at a roof in five minutes.” You can, and that five-minute look is why claims get denied. The documented version adds maybe fifteen minutes, and it is the difference between a $9,000 approved claim and a homeowner who files on your say-so, gets denied, and blames you.
“Can’t I just tell them I’ll handle the whole claim and cover the deductible?” No, and in Florida or Wisconsin that sentence can cost you up to $10,000 (Fla. Stat. 489.147). You handle the roof and the documentation; the homeowner handles the claim and owns their deductible. Deliver that and you still win on competence.
Frequently asked questions
What does hail damage actually look like on an asphalt shingle?
Round, bruised dents where the granules are knocked off and the asphalt or fiberglass mat shows through, often with a soft spot that gives under your thumb because the mat beneath has fractured. The pattern is random, unlike foot-traffic scuffs or the uniform look of age. The National Weather Service calls hail severe only at one inch or larger, and engineers say most shingle damage comes from stones about 1.5 inches and up (Insurance Journal).
How do I tell hail damage from normal wear?
Hail leaves a random impact pattern with granule loss and bruised, fractured mat. Normal wear is even granule thinning and age-curling across the whole slope, with no impact pattern and no soft spots. No impacts and no matching collateral on the gutters means it is probably wear, and filing wear as storm damage costs you credibility with the carrier.
Do I really need to chalk a test square?
You do not have to, but it is the most persuasive thing in your file. A chalked 10-by-10 square with every impact circled and counted gives the adjuster a countable damage density on a representative slope. It turns your inspection from an opinion into evidence.
How long does a homeowner have to file a storm claim?
It varies by state and, critically, by the policy's own notice requirement, which is often shorter than the statute. Florida bars a claim unless notice is given within one year of the date of loss (Fla. Stat. 627.70132). Document and report fast.
Can I offer to cover the homeowner's deductible to win the job?
No. In Florida (Fla. Stat. 489.147), Wisconsin (2013 Act 24), and other states it is illegal to offer to pay, waive, or rebate a deductible as an inducement, with Florida fines up to $10,000 per violation. The homeowner owns their deductible.
A thorough inspection is the whole game in storm work. It gets the claim paid, wins the job over the truck that eyeballed it, and keeps you on the right side of the law. Work the seven stages the same way, and get every finding into one system before you leave the driveway.